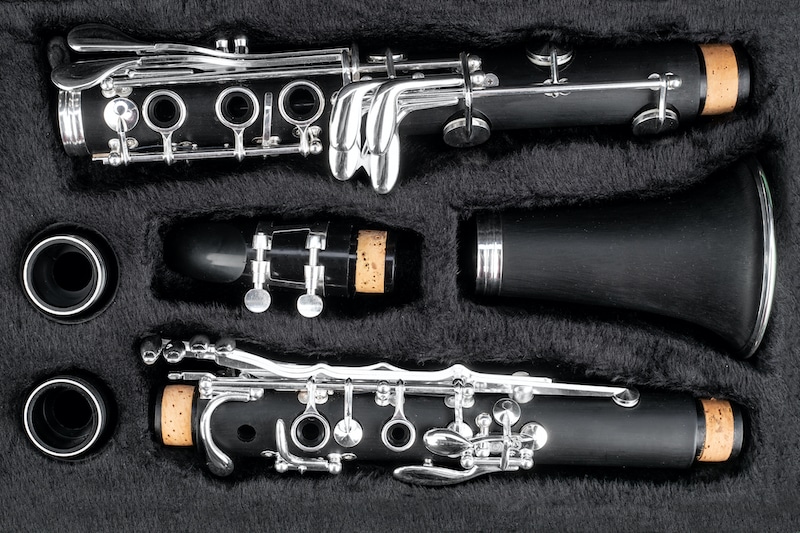
While the clarinet may appear to be a pretty compact instrument, it’s comprised of five main parts. These parts are the mouthpiece, barrel, upper joint, lower joint, and bell. All of the keys are located on the upper and lower joint pieces. The main pieces aren’t all you’ll need, though. A ligature and reed will both be needed as well. Some clarinetists also like to add a thumb rest cushion to reduce discomfort when playing, but this isn’t necessary.
In this post, we’ll walk you through all the necessary steps you need to take to know how to assemble a clarinet and disassemble it after. Let’s jump in.
How to Put Together a Clarinet: Step by Step Instructions
It may sound like a lot of pieces, but the clarinet comes together pretty quickly once you know how to.
We’d recommend taking a look our our post on the parts of the clarinet if you’re not so familiar with them.
But, once you are, follow these simple instructions and your clarinet will be ready to play in no time.
Step 1: Identify the Pieces
Open the case on a flat surface and make sure the case isn’t upside down.
Identify the pieces in your mind and ensure that all pieces are present.
Step 2: Start at the Bottom
When you begin to assemble a clarinet, you always want to start at the bottom and work your way to the top.
That means to begin, you’re going to attach the bell and the lower joint together.
Throughout the entire assembly process, take extra care to no grip any keys because it’s incredibly easy to accidentally put a little too much pressure on them which can cause the keys to bend or break.
Step 3: Line up the Joints
Step three is attach the upper joint to the lower joint and it’s probably the most difficult part of putting together your clarinet.
The tip is, don’t line up the keys from the start as it may not properly fit together.
It’s easy for beginners to accidentally damage keys like this.
Instead, put the joints together off-center.
Once the joints are together gently push down the keys on the upper joint while turning the lower joint until they’re properly lined up.
But, be careful not to use excess pressure while lining up the joints.
Step 4: Attach the Barrel
Next we’re going to attach the wide side of the barrel to the upper joint.
Line up the logos for the most aesthetically pleasing presentation.
Start with the barrel pushed all the way but the position may need to be adjusted later when you come to tune your clarinet.
Step 5: Add the Mouthpiece
Now it’s time to put on the mouthpiece.
Take the mouthpiece cap off and
Leave the ligature off until the following step.
Step 6: Ready the Reed
Before we put the reed on, it’s been to moisten it first by putting it in your mouth to wet it.
Make sure that the entire reed is moistened too, not just the thin tip.
The reed is incredibly fragile so be careful not knock it as this can crack or chip the reed making it unusable.
Step 7: Put on the Reed
Loosen the screw(s) on the ligature and slip it carefully over the mouthpiece.
Slide the reed on between the mouthpiece and the ligature.
Line up the tip of the reed with the tip of the mouthpiece.
Avoid touching the tip of the reed or it’s highly likely to crack.
Adjust its position using your thumbs while only touching the stock of the reed.
Once the reed is properly aligned, tighten the screws on the ligature.
Be careful not to over tighten the screw(s).
How to Disassemble your Clarinet

Now that you’ve put your clarinet together, it’s time to learn how to disassemble it so you can safely put it away back in its case.
Thankfully it’s just as easy and is done by taking apart the clarinet in the opposite order of putting it together.
To disassemble, you’ll need to work from top to bottom.
Step 1: Remove the Reed
Keep one thumb on the stock of the reed while gently unscrewing the ligature and once the screws are loosened, slip the reed off.
Try to take off the reed without touching the tip if you can.
If you’ve just finished playing, it’s better to let the reed dry a little before putting it in its case so you can wipe off the excess moisture and set it down with the flat side up.
Once it’s dry, store the reed in a reed case so as not to damage it as reeds are incredibly delicate.
Step 2: Take Off the Mouthpiece
Step two is to remove the mouthpiece from the clarinet and give it a clean.
Before you actually take it off though, make sure to remove the ligature as when gripping the mouthpiece to take it off it’s very easy to bend or damage the ligature.
To remove the mouthpiece gently grip it with one hand while using the other hand to grip in-between the barrel and upper joint and gently twist it back and forth until it comes off.
When dealing with a new clarinet, the corks can be sticky so it will be harder at first.
Once you’ve taken the mouthpiece off, give it a clean with the swab by putting the string in through the bottom and gently pulling it through the mouthpiece to ensure it’s dry.
Once the inside of the mouthpiece is dry, replace the ligature and mouthpiece cap and safely store it back in the clarinet’s case.
Step 3: Clean the Clarinet
It’s at this point that’d recommend you to swab out the clarinet as a whole to ensure you remove all the water from the inside.
Just insert the string end of the swab through the bell until it comes out of the barrel and gently pull it through the instrument.
Repeat until the clarinet seems to be dry before continuing to disassemble.
Step 4: Take Off the Barrel
The next piece to remove is the barrel and it’s done some in the same way as removing the mouthpiece.
Gently twist it back and forth while gripping the upper joint being careful not to damage any keys as you’re gripping.
Once it’s off, you can quickly swab it again to remove any moisture and then place it back in the case.
Step 5: Remove the Upper Joint
Step 5 is to remove the upper joint of the clarinet.
Again, we want to try not to touch any of the keys if possible as they may bend if excess pressure is placed on them.
Grip the upper joint right at the top above the keys and then grip with your other hand near the bottom of the lower joint being especially mindful of the keys on the side of both the upper and lower joints of the clarinet.
Gently twist back and forth with short movements as you pull upwards to take the two pieces apart.
Once it’s off put it back in its place in the case.
Step 6: Disconnect Lower Joint and Bell
Finally, we’ll disconnect the lower joint and the bell as always being mindful of the keys to prevent them from getting bent.
Use the same gently twisting motion with short movements back and forth to take it apart.
When swapping the lower joint you need to be careful of the bridge key which has a small metal piece pertruding inside.
You can sometimes get your swab caught on this so be careful to not pull it too hard which can cause damage.
Once you’re done place each piece in its respective place within the clarinet case.
Step 7: Final Cleaning
To finish, check each piece individually to make sure there isn’t moisture in any of the crevices.
Run the swab through any of the pieces that have moisture left in them.
And of course, properly close the case when you’re finished to prevent any accidents when lifting it.
Don’t Forget the Cork Grease
If you notice it’s a little difficult to connect any of the joints of your clarinet while putting it together, generously apply cork grease on the cork.
If it still seems difficult to twist the pieces together, try putting them together and taking them apart one or two times to see how well lubricated the cork is.
If it’s still not quite right, you’ll probably need to apply some more.
I use this one which works well and is very inexpensive:

- ALL-NATURAL CORK GREASE made with high-quality ingredients
- PREVENTS CORK DRYING and cracking, extending the life of your instrument
- SMOOTH APPLICATION for easy use on cork joints, making assembly and disassembly a breeze
Thumb Rest Cushions
Thumb rest cushions aren’t a necessary part of the clarinet, but some musicians like to use them to make playing more comfortable.
These can be added to your clarinet once you’re done putting it together.
A thumb rest cushion will simply slide over the metal thumb rest on the lower joint of the clarinet.
But, don’t store the clarinet with the thumb rest cushion still in place because that will make it so the lower joint doesn’t properly fit in its place within the case.
Store it on the side with the swab and reed(s) when it’s not in use.
Dry all the Crevices
As we’ve covered a lot during this post, when cleaning your clarinet after playing, you’ll want to make sure that it’s fully dry before putting it away.
You don’t want saliva sitting in your instrument for an extended period of time for sanitary reasons.
Make sure you run the swab through either the instrument as a whole or piece by piece as you take it apart.
Something like the one below:

- Made of high quality , specially designed microfibers
- Strong cord with easy pull-through weight
- Best humidity and grease absorption available
Look at each piece from the top and bottom to make sure you don’t see any moisture left in the instrument.
The barrel often holds the most stagnant moisture so be mindful of this piece but don’t ever run the swap through the mouthpiece.
It’s the most delicate part of a clarinet and running the swab through can change the shape of the inside which can negatively affect the instrument’s sound.
Always use your Mouthpiece Cap
Any time that your clarinet is out and not being played, the mouthpiece cap should be utilized.
The mouthpiece cap will help protect the reed and mouthpiece alike which are the two most delicate parts of the instrument.
Safely Store your Reed
Reeds are incredibly fragile and you’ll go through plenty of them as a clarinetist.
One of the most important things in caring for your reed is to never touch the tip because that’s where it’s prone to cracking.
Always remove your reed when putting it away and never leave the reed attached to the mouthpiece or just put it into the clarinet case.
A reed should always be put into a reed case that will not only protect it but ensure that it properly dries out after use.
Most reeds come with individual reed cases and larger reed cases are also available to be purchased.
I recommend this simple one for my students that works well:

- REED CASE - D'Addario's signature reed case holds your reeds safe and secure.
- PREVENTS WARPING - Features a grooved surface that holds reeds snugly in place while preventing warping.
- AIRTIGHT SEAL - Crafted with an airtight gasket for unstable weather conditions
Putting Away Your Clarinet
Some of the spots in the case may look similar especially when you’re just getting started with the clarinet but try to remember where each piece goes.
if you’re brand new to the clarinet, it may be helpful to label which piece goes in each spot.
If the pieces of the clarinet aren’t put away correctly, the keys could get bend or the instrument could get damaged.
And again, make sure the case is securely closed once you’re done putting your clarinet away.
It’s so easy to accidentally not fasten the case which means when you pick it up the pieces all fall out and you can cause a lot of damage to the instrument.
Check The Screws
And lastly, when assembling or disassembling your clarinet, it’s a good idea to periodically check the screws on the instrument.
These tiny screws hold the keys in place and checking them can save you a lot of money in possible repairs.
If you see any loose ones, just grab a flat head screw driver and tighten them.
That’s it for Assembling a Clarinet
That’s it for our how to assemble and disassemble a clarinet, we hope you found it helpful.
As with most things in music, at first it can seem overwhelming and like there are lots of steps, however, each step is fairly quick to accomplish and the more you do it, the quicker you’ll get.
Putting your clarinet together and taking it apart will soon become second nature and the process will be something that you no longer need to think about.
Good luck and get in touch if you have any questions.