It’s inevitable that eventually your piano keys will get dirty. Whether you play regularly or only once in a while you must clean your instrument routinely to help ensure that it lasts. Dirt, skin oils, and dust can not only get on the surface, but it can also get in-between the keys meaning sticky and a very unpleasant practice session. Before you get your cleaning supplies, though, you have to understand that you can’t treat your instrument like a window or table during spring cleaning. There are specific methods you must adhere to. If not, then you could end up damaging your piano by accident.
In this post, we’re going to cover everything you need to know about how to clean piano keys, what products to use and how often to clean it. Let’s get started.
What are Your Keys Made of?

Before you start to clean your piano keys, it’s worth knowing what kind of material your keys are made as this will determine what products to use for cleaning them.
At their core, piano keys are usually made of wood but we’re going to be more focused with what the key-tops are made of.
Piano keys tops and fronts are typically made of one of two kinds of materials:
- Ivory
- Plastic
Acrylic Plastic or Ivory Imitation
Nowadays, due to ivory being illegal most manufacturers will make their piano keys out of acrylic plastic or ivory imitation material called Ivorite.
Since it’s the industry standard and if you’ve bought your piano brand new, your instrument is most likely made with this material.
Ivory
But, Ivory is a different story and piano keys were made of this material up until even the 1970s in the US and the 1980s in Europe.
Ivory is made of elephant tusks, and due to extensive poaching it’s led to this amazing animal’s endangerment and so now there is a global ban on products made from ivory.
That doesn’t mean that owning a piano with ivory keys is illegal though.
You can tell what your keys are made of by looking at when your piano was made (after 1970 and it’s probably not ivory) and if it is from before then you can look closely at the key top.
Ivory is off-white and tends to yellow over time.
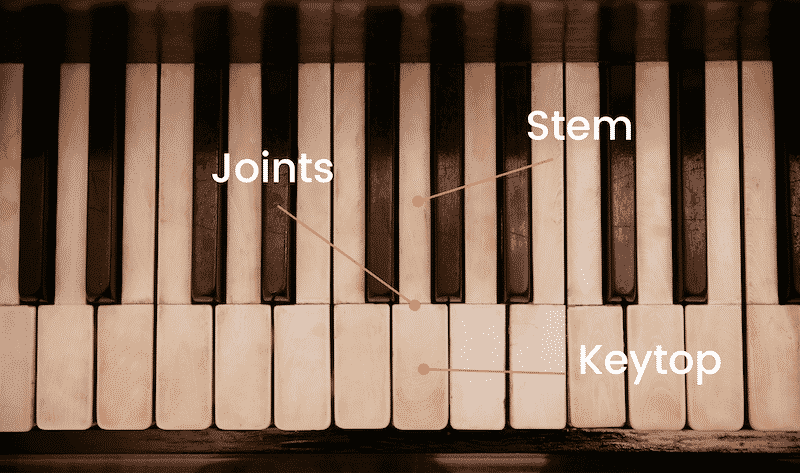
Ivory keys are also made up of two parts on the top so you’ll see a horizontal line that runs through the white keys at the base of the black keys joining the key’s stem to the key top.
This is a sign that your keys are probably made of ivory.
Because they are porous, they tend to be more difficult to clean than plastic keys.
That’s why you must distinguish between the two materials to prevent you damaging your instrument by using the wrong cleaning method.
Instructions for Cleaning Piano Keys
Step 1. Remove Dust
To begin, you’re going to need to take a dry dust cloth and gently wipe your keys down to remove and excess dust that’s settled on the keys.
It’s important when wiping them down to wipe towards you as this will prevent the dust from collecting in the gaps between the keys.
Step 2. Wipe Down the White Keys with Soapy Water
Next you’re going to want to take another cloth and wipe it down with soapy water.
We recommend using a solution of one part ordinary dish soap and four parts water.
Lightly dab the cloth in your soap solution (an area the size of your fingertip) and then clean each key one by one starting at the bottom and working your way from left to right.
Don’t forget to always wipe the keys from back to front and make sure that your cloth is clean.
Once you’re done, use another cloth to dry them all.
Step 3. Clean the Key Fronts
Next you’ll want to do the same thing for the key fronts dabbing your cloth in the soap solution and cleaning them.
Step 4. Repeat For the Black Keys
Step 4 is to repeat the steps above but for all the black keys.
It’s important to clean the black keys second as sometimes you can stain the white keys.
What About Plastic Keys?

These simple step-by-step techniques can also be used for ivory and plastic keys.
But you can also use diluted white vinegar to clean plastic keys as this solution is excellent for removing stains and fingerprints.
But, if you’re cleaning the plastic keys on a digital piano, you want to be careful about not using too much water on your cloth as this can damage it.
Just in case, though, be sure that you read the manufacturer’s manual for further details on proper maintenance of digital pianos.
One thing to mention about plastic keys though is that you should not leave them exposed to direct sunlight for long periods.
This can cause them to turn yellow and lose their color.
Cover your windows with curtains, blinds, or other forms of protection against the sun if your instrument is in its direct light path.
Interestingly, the opposite is true with ivory keys as putting them in direct sunlight can help them whiten more after a while.
Polishing Ivory Keys
While cleaning plastic and ivory keys is pretty much the same, what’s different with ivory, though, is the polishing.
Overtime you’ll find the ivory keys will lose their whiteness and start to discolour.
If you need to you can replace ivory keys (through legally obtained ivory or key tops from old pianos) but you can also polish them to bring back more of their original colors.
Luckily, you don’t have to purchase an obscure and expensive product to do that too!
Believe it or not, toothpaste is a common item people use to polish their ivory keys and works reasonably well.
It turns out that the brightening substance in this dental product used to whiten teeth can also whiten ivory keys.
What Not to Do
So to recap some of the don’ts:
- Don’t use any chemically-based cleaners from the store (there’s a reason we recommend using home-made solutions)
- Don’t use disinfectants (even if it’s during flu or cold season)
- Don’t put the solution directly on the keys (this is to prevent moisture from seeping through the cracks)
- Don’t use paper towels or a scouring pad (as this can scratch the surface)
- Don’t wipe your keys horizontally (as this risks dust and moisture entering the crevices between them)
- Don’t wipe from front to back (as that will push the dust behind the keys)
- Don’t expose plastic keys to direct sunlight (as this can cause them to lose their colour
Tips on How to Maintain Your Keys
Cleaning your piano’s keys isn’t a one-time task and it will require regularly cleaning and maintenance.
If you want your instrument to last a considerably long time, you’ll have to do this job regularly to keep it in the best condition possible.
But, that doesn’t mean you have to utilize the same methods above every time.
You could dry wipe the keys once a week to prevent the build-up of dust but how often you give them a full clean depends on how frequently you and others play the piano.
You can give the keys a deep clean once every six months or a year if you rarely touch it, but once a month is recommended if you use it all the time.
Wash your Hands Before Playing
Another simple thing you can do to keep your piano clean is to ensure you wash your hands before before you touch your instrument.
This will prevent as little dust and oil as possible from transferring to your keys.
You must also ensure that your hands are dry as the moisture can transfer to your keys.
Use your Piano Cover
Don’t forget to use your piano’s key cover.
If you have one, always use it when the pianos not in use.
Not only will this prevent dust from accumulating on the keys but it will also protect it against accidental spillage and accidents from seriously damaging your keys.
But, if you have an older piano, don’t cover the keys for too long as humidity can cause damage, so open up the cover once in a while.
Monitor the Humidity and Temperature
If you have a high end or antique piano, you’ll want to try to keep the temperature and humidity levels consistent in the room you’re keeping your piano.
Constant changes in temperature can lead to damage not just to the keys but the rest of the piano in general as it causes the materials to expand and contract as it heats up and cools down.
Summing Up Cleaning Piano Keys
So that about wraps up our post on how to clean the keys of your piano, we hope you found it helpful.
It’s important to remember that cleaning your piano keys is an essential maintenance task that you must do to ensure that it stays functional for a long time.
It’s an easy task that you will already have the products for at home so you won’t have to spend any money on fancy supplies.
Cleaning it regularly also has the affect that you’ll want to play it more and your practice sessions will be more enjoyable. Happy cleaning!