The parts of a euphonium each have a unique purpose. Even if you understand the components of other brass instruments, the euphonium can be a bit different.
Sure, the parts may be the same, but the layout isn’t always identical to other instruments. If you want to learn and play the euphonium, knowing all about the parts is crucial.
Anatomy of the Euphonium
The parts of a euphonium are very similar to the pieces of other brass instruments.
However, there are a few differences, particularly in the setup of the euphonium.
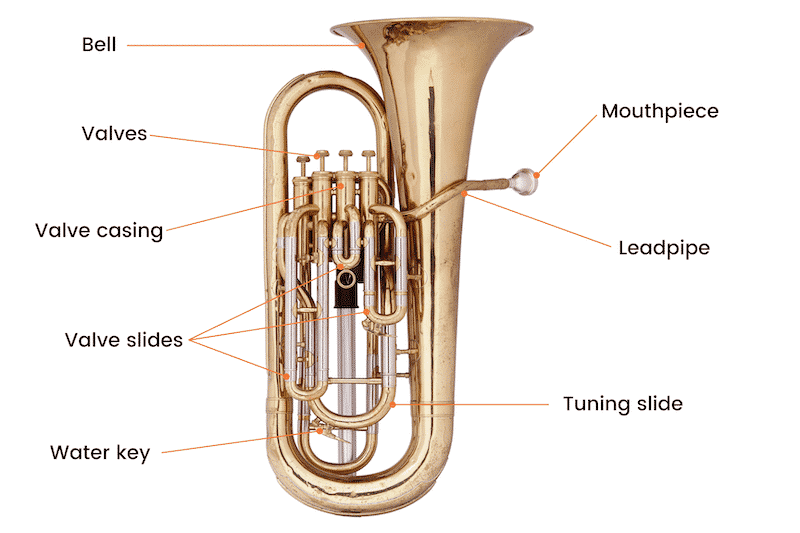
The euphonium is comprised of these pieces, which we’ll cover in detail below:
- Mouthpiece
- Leadpipe
- Valves
- Spit valve
- Tuning Slide
- Bell
Mouthpiece
The mouthpiece is the part of a euphonium that touches the player’s lips, or embouchure.
It’s also the only part that is separate from the rest of the instrument when you store it.
That allows euphoniumists to choose a mouthpiece that helps them play the music they want to play.
Mouthpieces have a rim, which is the edge that touches your lips.
Just inside of that is the cup, which can affect the volume and power you can get when playing.
After that, you have the throat and finally, the backbore, which is where the mouthpiece tapers.
You’ll connect the smaller end to the mouthpiece receiver, which is the smaller end of the euphonium body.
It’s essential to choose a mouthpiece with the right size shank so that it fits smoothly in the body of your euphonium.
Leadpipe
The leadpipe is the end of the euphonium that connects to the mouthpiece.
While many euphoniums use the same material for the leadpipe and the rest of the body, it’s not necessary.
Having a different material here may help change the tone quality.
You can’t remove the leadpipe from the euphonium, so it needs to be a good size.
That way, you can insert your mouthpiece of choice into the instrument.
The tubing of the leadpipe curves a bit, and it leads you to the rest of the body.
Since air passes through the leadpipe before the rest of the body, it can make a massive difference in the sound you can produce.
Valves
The next few parts of a euphonium make up the valves.
Like many other brass instruments, a euphonium uses valves to change pitch.
Most euphoniums have three valves, though some have four.
On an instrument with three valves, they will sit in a line in the middle of the body.
The player will use the first three fingers on their right hand to trigger the valves.
If there’s a fourth valve, it may be in line with the others, and you will use your pinky.
However, it may be on the side of the instrument, so you’ll use your left hand to play it.
Within the valve section, there are a few smaller parts that you should know.
Valve Casings
The valve casings are the tubes that cover the valves, and they’re what you see when you look at the valves.
And the casings shouldn’t have any leaks and if there is a leak, it will be hard or impossible to produce a sound.
Valve casings also protect the inside of the valves as they move up and down.
That way, your instrument can stay in good condition for a long time.
Along with the casing, you also have top and bottom caps.
The caps help protect the valves inside.
Valve Slides
Another vital part of the euphonium is the valve slides.
These slides correspond to each of the valves, and they’re part of the overall tubing of the instrument.
Before you play, you will need to adjust these valve slides to make sure the euphonium is in tune.
Look at a tuner and slide the valve slides in and out.
Moving the slides in will shorten the tubing and raise the pitch.
On the other hand, moving the slides out will lengthen the tubing and lower the pitch.
You can use these slides to adjust the pitch to be more precise.
Finger Buttons
On top of the valves, you will find finger buttons, and these are what you’ll press.
Each valve has its own finger button, so you can trigger the valves independently of the others.
A euphonium with three valves offers eight fingering combinations.
Adding a fourth valve doubles that to 16 possibilities.
While knowing the fingerings is important for playing a euphonium, you also have to combine that with your embouchure on the mouthpiece and your airstream.
That way, you can play the correct pitch.
Piston vs. Rotary Valves
Most euphoniums use piston valves, which are similar to those of a trumpet.
Piston valves press the valve down to access different tubing for the intended note.
On the other hand, rotary valves rotate in a circle to access the tubing.
If you play a euphonium with piston valves, you will hold it off to the right.
The finger buttons will be circles on the tops of the valves.
A euphonium with rotary valves sits to the left, but you will still use your right hand.
The finger buttons will look like those on a French horn.
Spit Valve
Its name can be confusing, but the spit valve isn’t like the other valves on a euphonium.
Instead, it’s a small key that you can open to release water or condensation.
As you play, your spit can collect inside of the euphonium, and it can be hard to get out.
To get the spit out, it would have to travel the entire length of the instrument.
However, the spit key makes it so that the spit doesn’t have to travel as far.
The spit key sits near the bottom of the instrument, so it’s easy for water to reach it.
You’ll want to set a cloth on the floor and empty the water key over it.
Then, you can wash the cloth and keep your floor from collecting the spit.
Tuning Slide
While you can adjust the tuning with the valve slides, you can also use the tuning slide.
This is important if your entire instrument is out of tune.
You can move the tuning slide in and out to raise or lower the pitch, respectively.
That way, you can tune the instrument more quickly.
If one or two of the valves are still out of tune, you can move them.
However, only using the valve slides to tune can be complicated.
The tuning slide makes it easy to tune the whole instrument at once.
Bell
The last part of the euphonium is the bell, and it’s where the sound escapes from the instrument.
Overall, the euphonium has conical tubing, meaning it slowly gets bigger.
However, the bell has a larger and faster flare than the rest of the body.
A euphonium’s bell points upward like that of a tuba.
Because of that, it can be hard to project your sound as well as a trumpet, where the bell faces forward.
However, you can try bells with different measurements.
A slightly larger bell can make it easier to play louder without as much work.
Some bells are also a different material than the body.
Like the leadpipe mentioned before, a different material can affect the sound of the instrument.
Reviewing the Parts of a Euphonium
Understanding the parts of a euphonium can help you play the instrument.
You will know where to place your lips and fingers, and you can figure out how to tune the euphonium.
Be sure you know the different parts, even as a beginner.
That way, you won’t have to worry about not having the right technique to play.