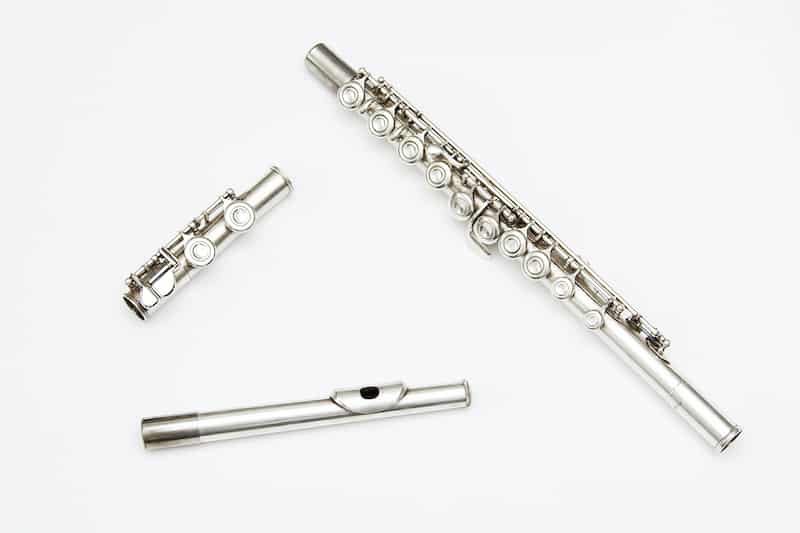
As the only orchestral woodwind instrument without a reed, the flute may look simple to put together. When you open that case for the first time, you will see three shiny pieces gleaming back at you.
Putting them together must be obvious, right? Not necessarily! There are a few pitfalls to look out for and some tips which will make the job easier. If you take the time to read these instructions, you will be assembling the instrument confidently and safely in seconds before you know it.
In this article, we will look at the different component parts of the flute and explain step-by-step how to assemble and disassemble it effectively without damaging the delicate mechanism. Before we get started, however, it will be helpful to learn a few basics about this amazing instrument.
Anatomy of The Concert Flute
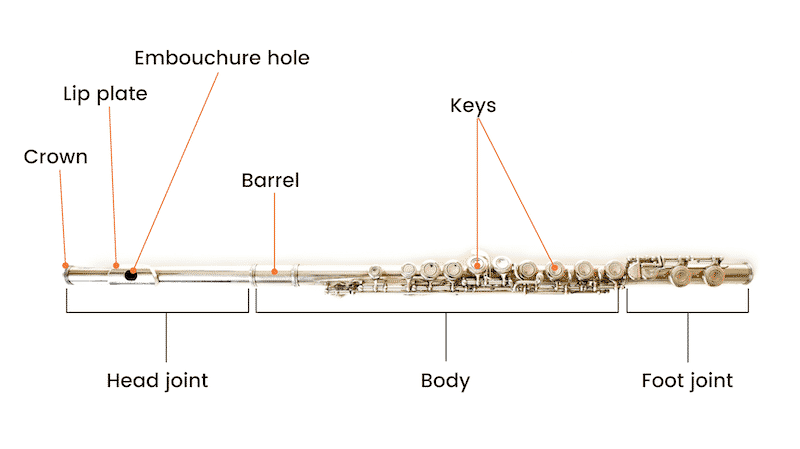
Although the word ‘flute’ can be applied to a huge range of instruments of varying shapes, sizes, origins and sound worlds, the instrument most familiar to many of us is about 67 cm long, made of metal, and is played by blowing across a blow hole while operating a complex system of keys to change the pitch.
Known as the Concert Flute, this instrument has three parts:
- the head joint
- the body
- the foot joint
To hear it in its full glory, all of the parts must be assembled correctly; however, a sound can be made from just the head joint – a useful way for a beginner to get started without delay.
The head joint is the only section with no keys or additional mechanisms, so is easily identifiable.
It incorporates the lip plate and blow hole and has a removable ‘top’ known as the ‘crown’ or ‘end pin,’ which is vital to tuning but should not be touched or removed except by an experienced player or flute repairer.
The body is made up of rods, springs, keys, and pads, which are put together in a complicated mechanism to ensure all of the holes can be covered with the player’s eight fingers and left-hand thumb.
The foot joint is the smallest piece of the instrument and features more holes, pads, rods, and keys – all of which are operated by the player’s right-hand little finger.
Assembling the Flute: A Step by Step Guide
Before attempting to assemble the flute for the first time, ensure that you have clean hands, a calm mind, and plenty of time!
Children should be supervised as the instrument can be easily damaged.
Step 1: Get the Case the Right way Round
It sounds obvious but before you start, ensure the case is on a clean and level surface and that it is the right way around before opening.
If this is not obvious, you may wish to put a label or other identifying feature on the top of the case to avoid mistakes.
Once you are sure it is the right way round, open the case – this can be more difficult than it sounds!
Some flutes are sold in a ‘double’ case – an outer padded fabric carry case and an inner hard protective case.
The carry case will usually open with a zip, while the hard case usually has a more secure mechanism such as a flip-over latch or a push/slide latch.
A proper flute case (like the one below) has padding designed to fit the pieces exactly, which is necessary to protect this delicate instrument from damage in transit.

- Responsibly made: All materials tested to be free of Lead, DEHP, PAHS8, DBP, and BBP.
- Tough exterior: Made of rugged 600D nylon. EPS foam frame is lightweight, rigid, and shock resistant for excellent protection. Main handle made of...
- Shoulder straps: Features a large adjustable shoulder pad and strong lightweight clips. QuickLock hook and loop case closure allows you to securely...
As an extra tip, once you have opened it for the first time, take a photograph for future reference.
That way, you will know which way round the pieces should go.
Step 2: Recognise the Pieces
Next, I recommend you familiarise yourself with which piece is which.
Once you are, take out the head joint and the flute’s body and try to hold the pieces on the smooth metal as much as possible.
The keys and rods are delicate and can easily be damaged, so the instrument should never be picked up or gripped over them.
Step 3: Attach the Head Joint to the Body
Use one hand to hold the head joint so that the crown and lip plate are at the top.
In your other hand, hold the body of the flute, ensuring that the barrel is at the top.
Carefully push the head joint down into the tube of the body.
Once inside, it should be possible to rotate the head joint to the required position.
Step 4: Attach the Foot Joint
Holding the half-assembled flute carefully with one hand (taking care not to put pressure on the keys or rods), take the foot joint out of the case and ensure that it is the right way round (see diagram).
As before, carefully push the already assembled head joint and body into the foot joint.
Again, it should be possible to rotate the foot joint into the most comfortable position.
You should now have all three pieces assembled, but they may not necessarily be the right way around!
Read the section below to make sure your flute is in the best possible playing position.
Lining The Flute Up

As a basic guide, the hole in the head joint should be in line with the first key on the front of the body of the flute and with the rod on the foot joint.
The position of the head joint relative to the body is vital in ensuring accurate tuning and a good tone however, the foot joint can be adjusted to ensure comfort for the player, and its position will depend upon the size of the player’s little finger!
Now it is time to enjoy playing!
Disassembling The Flute Instructions
Once you have finished playing for the day, don’t be tempted to leave your instrument on a table, chair, or any other surface.
Flutes have a terrible habit of slipping or rolling off tables, being sat on, or finding themselves at the bottom of a pile of heavy books!
As stated earlier, the mechanism is very delicate and can be easily damaged.
Even minor damage could affect the tone quality, and efficiency of the instrument and repairs can be costly and inconvenient so it’s just not worth the risk.
When you are ready to begin disassembling the flute, find a place to put it down carefully (not near the edge of a table or under that pile of books!).
Take the cleaning rod out of the case and thread a piece of material or a cotton handkerchief through the hole, then follow the steps below:
Step 1: Take Apart The Head Joint
The first step is to take apart the head joint from the body.
While taking it off, take care to avoid gripping the keys as this can damage them.
Carefully twist the head joint to and fro, gently pulling it upwards and thus separating it from the body.
Step 2: Clean The Head Joint
Put the body (with the foot joint still attached) carefully down in a safe place and clean the inside of the head joint by gently pushing the cleaner up the tube.
If you don’t have cleaning supplies, you can get a kit like the one below:

- All-Inclusive Kit - Everything you need for instruments maintenance: Flexible Bore Brush + Dust Brush + Cleaning Cloth + Premium Cork Grease + 3...
- High Quality - Durable, safe, odorless, & more! We carefully choose the best materials to produce the kit. Special scientifically blended lubricating...
- Save Money - Libretto listens to our customers’ voice & reviews. We keep improving the kit to make it both high-quality and COST-EFFECTIVE. This kit...
Moving the cleaner gently up and down the tube and rotating it slightly will ensure that the flute is dry and clean inside, preventing a build-up of dirt or rust.
You can also wipe the outside of each piece of the flute with a designated cleaning cloth or duster, taking great care not to get any fluff in the mechanism.
This will remove fingerprints, stickiness, or sweat caused during all that practice!
Do NOT use any commercial cleaners on the instrument – this is unnecessary and can cause damage.
For more information about this, read our detailed guide to cleaning the flute.
Step 3: Put The Head Joint Away
Now that it’s clean place the head joint into the case, ensuring it is the right way around.
It should fit exactly, and if you’re unsure, you can refer to the picture you took earlier.
Step 4: Separate The Body and Foot Joint
Step 4 we’re going to go through the same process with the body and the foot joint.
Pick up the rest of the flute and separate the two remaining parts while gently twisting them back and forth.
Again, remember not to grip the keys to prevent any damage.
Once you’ve separated the two pieces, clean them one at a time as described above.
Step 5: Put the Body and Foot Joint Away.
Once you’ve cleaned them both, place the body and foot joint in the case, again ensuring that they are the right way around.
Step 6: Close and Fasten the Case
It sounds obvious, but the last step is to ensure that your flute case is securely fastened.
Many a flute has been damaged by a spontaneously opening flute case, so it is really worth checking.
Using a double case, as described earlier, can also reduce the risk of damage caused by case malfunction.
Summing Up The Assembly Process
That’s it for our guide to assembling and disassembling a flute, I hope you find it helpful.
Whenever possible, flutes should be stored in a safe place, especially if there are curious young children or pets in the house.
They are also best kept in moderate temperatures as, although heat/cold is unlikely actually to damage the instrument, it will affect the tuning significantly and will make the performer’s job a great deal more challenging!
Following the advice given above will ensure that you develop an effective and safe system for assembling and disassembling your precious flute.
This is a vital part of your practice routine and will ensure that the flute will continue to sparkle and produce a beautiful tone for many years to come.