You’re started learning the clarinet and it’s all going well but your reed is not sounding right and your lesson isn’t for another week! No matter how skilled you are at playing though, if the reed is chipped or not properly attached there’s nothing you can do, the clarinet will not play or sound right. But, don’t worry, it’s really simple to be able to change your reed and we’ll get you back up and playing in no time.
In this post, we’re going to take a look at our step by step guide of how to put a reed on a clarinet. Let’s get started.
Choosing the Right Clarinet Reed
Before we get to the instructions, the first thing we need to cover is that you’ve got the right reed for your clarinet and your ability.
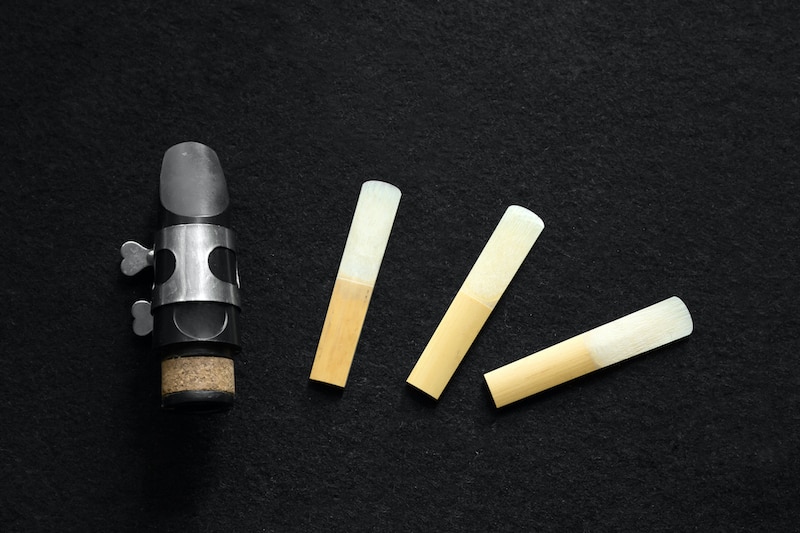
Clarinet reeds are not one size fits all and they actually come in a number of different sizes and half sizes ranging from 1 to 5.
The higher the reed’s number, the harder the reed is, and vice versa, the lower the number, the softer the reed is.
So when looking to buy clarinet reeds which size should you get?
Well the harder the reed, the richer the sound, and the wider the range of notes the clarinet can hit.
But, the hardness of the reed also determines how easy it is to produce sound with higher reed numbers requiring a greater deal of lip work, or embouchure, to sound good.
The harder the reed, the harder your lip muscles have to work to maintain proper embouchure, so novice players and those who have not played in a while will tire quickly on a harder reed, quickly finding it difficult to produce the correct sound.
Most clarinetists have a range of sizes on hand so that they can always meet themselves wherever their “chops” are at and constantly push themselves to work their way up to the hardest reeds.
It’s just like exercising any other muscle!
So for beginners, we’d recommend starting with reeds under 2.5 before graduating to higher numbers.
But don’t worry about just sticking with lower numbers and if you’re struggling to get a good tone on the low notes try a soft reed.
Attaching the Reed Instructions
Now that you have chosen your reed, it is time to place it on your clarinet!
We’ve mentioned it before and will mention it again, but, reeds, especially bamboo ones are very sensitive and quite thin at the tip.
It is therefore crucial to follow these steps precisely in order to extend the life of each reed and be careful not to ever touch the very thin and fragile tip.
Step 1: Preparing the Reed
Unless you are using a synthetic reed, you will need to wet your reed.
Many clarinetists fall into the bad habit of just putting their reeds in their mouths and allowing their saliva to wet the reed.
Throughout play, your reed spends a lot of time in your mouth, so it will be exposed to saliva regardless, but the acids and enzymes in human saliva actually deteriorate reeds at a faster pace.
It is therefore important to initially soak your reed in plain water by placing it upside down in a small container with water that comes up to about a finger nail’s depth.
Leave it there for only a few moments, about the length of time it takes you to assemble the rest of your clarinet.
But, you should only soak brand new reeds in water for around 10-15 seconds as they absorb water much quicker.
Step 2: Putting On the Ligature
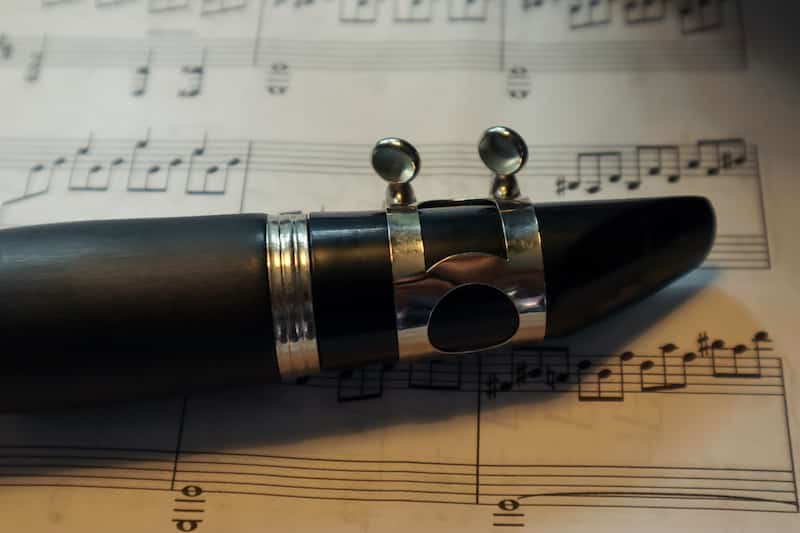
Once you’ve put together your clarinet, and just before you’ve placed your reed on it, you need to place your ligature on your clarinet’s mouthpiece.
The purpose of the ligature is to hold the reed in place and its placement and tightness determines the pressure placed on the reed, which influences the sound quality.
There are many different types of ligatures ranging from the most affordable metal ones, to more flexible midrange plastic ones, to ones made from higher quality and softer leather.
Whatever type of ligature you have, it will have some sort of tightening mechanism.
Loosen it just enough to slide over the mouthpiece with enough room for the thickness of the reed.
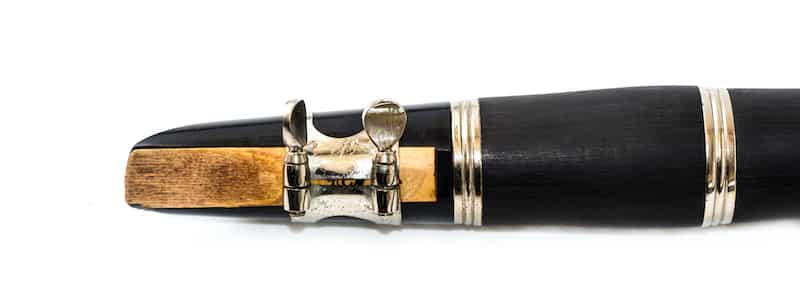
Take your reed out of its water, wipe off any excess moisture, and then place the reed at the top center of the reed opening in the mouthpiece.
Slowly slide the reed down, under the ligature, until the rounded tip of the reed lines up perfectly with the rounded tip of the front of the mouthpiece and is perfectly centered.
Adjust the ligature so that it is in the middle of the base of your reed (the smooth part of the reed that your mouth never touches).
Then, tighten the ligature until the reed is secure when you place it in your mouth and play, but not so tight that it cuts into the reed and leaves a mark.
Step 3: Managing the Reed During Play
If you are doing a quick 30 minute practice, you should be all set with the above but, for a longer rehearsal or performance, you will need to maintain the moisture level of your reed and perhaps even change reeds.
Moisture helps the sound vibrate, so you will know your reed has gotten too dry when your sound quality starts to sound a little flat.
Another reason you want to keep your reed moist is that dried up reeds are also more prone to splitting and breaking.
Reeds expand slightly when moist, so if it starts slipping around on the mouthpiece, that might be another indicator it has become too dry.
The act of playing alone keeps your reed moist, so they usually dry out when you are holding for a lot of measures in a row.
That being said, if you are doing a normal practice, it is probably enough to wet your reed with your mouth every so often, wiping it if it becomes too moist.
If you are in the middle of a marathon rehearsal or long performance, you might consider keeping your water container next to you to re-soak your reed during long rests.
It’s also a good idea to keep new reeds next to you and slightly moist in the event that your current reed breaks.
If your lips become so fatigued that it starts to affect your sound quality, or if you know you have a particularly quick passage coming up that is difficult for you to play with a harder reed, you might want to specifically keep thinner reeds at the ready.
Removing the Reed
Once you are done playing, you’ll need to carefully move backwards through the steps above.
Unscrew the ligature slightly, slide the reed out very carefully, using your thumb to push it up from the bottom, remembering to never grab it from the tip.
Place it back in some plain water while you disassemble the rest of your clarinet.
Rinse it briefly with water, wipe it off carefully, then place it in its case.
Reeds are sold in cases, but it is worth investing in nice reed cases that protect them well while allowing them to breathe like the one below.

- REED CASE - D'Addario's signature reed case holds your reeds safe and secure.
- PREVENTS WARPING - Features a grooved surface that holds reeds snugly in place while preventing warping.
- AIRTIGHT SEAL - Crafted with an airtight gasket for unstable weather conditions
Knowing When It’s Time to Replace Your Reed
No two reeds are created equally and from time to time, you’ll find that some are too soft regardless of the hardness scale and never produce a solid sound.
At some point, you must say goodbye to even the most robust reeds with the greatest sound quality!
Whenever your reed splits or chips you’ll know it has as your clarinet will create an airy or raspy sound, and it’s impossible to repair.
But, if your reed isn’t chipped or split you’ll be able to tell when it is time to replace it based on its sound quality.
Weakened reeds lose the ability to vibrate, producing an airy, dull, and cloudy sound so if this is the case, you’ll need to get a new reed.
Sanding The Reed
When you purchase brand new reeds you’ll usually find that they are a bit rough at first.
Not only can this be unpleasant for your lips and tongue, but it also affects the reed’s ability to absorb moisture and vibrate evenly.
We’d recommend that you keep a piece of fine grade sandpaper in your clarinet case.
When you are using a new reed for the first time, or you notice that a used reed has become rough, hold the sandpaper in one hand and gently rub the rough portions of your reed over it.
Summing Up Replacing Clarinet Reeds
We hope that helps you when it comes to how to replace your reed on a clarinet.
It’s not as difficult once you know how but it does take some practice.
Just remember to keep your reed moist and try not to touch the tip and you’ll be good to go.